Posts

Guinevere's 3D Pir

Image
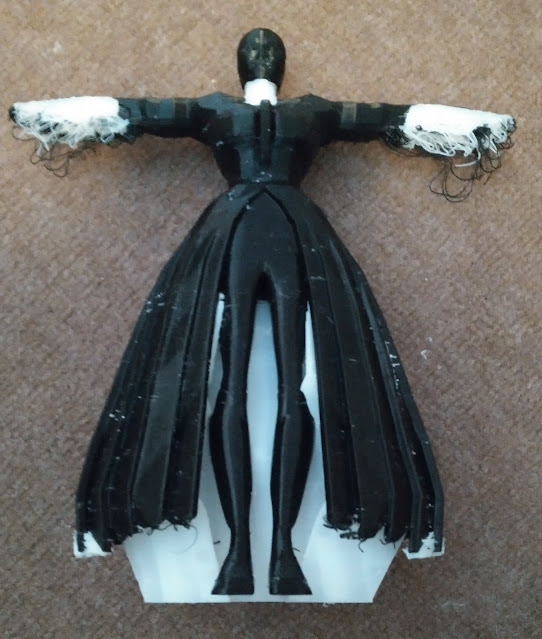
  After the Guinevere model was complete, we got her 3D printed. We originally sent her entire body to print as a whole model, however the arms were not printed properly. Despite this, the rest of the body was very well done.  The supports need to be removed and the arms replaced. In order to replace the arms, we will reprint the arms separately. We will then remove the original arms and add on the newly printed ones.  I'm really happy with how she turned out and having her as a physical item after working on her for so long is very satisfying. I wish to get Arthur printed as well but may not be able to due to lack of time. 

Finished Arthur

Image
 After a lot of work on the Arthur model, it is now complete. I went back over his model to finalise shapes and smooth edges in multiple areas of his body. I used the chamfer tool to soften the edges, in particular around the legs and some areas on the arms. Now that these parts are smoothed slightly, it makes he appear to be more refined. I did struggle around the knees however as I have to chamfer around the four outer connections. By using chamfer, some of the vertices ended up being in difficult places which needed to be altered in order to make it look better. This took a considerable amount of time as it was all in an awkward place with inner and outer vertices to take into account.  I do however like the final outcome as it makes him appear to be less angular and a little more realistic.

Looking at other modelers

Image
 While I've been working to completing my own models, I've been looking at how other people have modelled their own. As I've been looking at robot designs for my own, I've gone to Sketchfab to see how others have been designed and made.  When looking at references for my Arthur model, I wanted to look for more masculine models. I came across this example by Slava Z. showcasing a male robot model. This is a good example as with this particular robot, the creator has made it so you can see it with different parts missing. This allows us to see how some of the model is made and how each part fits with the rest.  By panning along the timeframe, you can see the armour and limbs be taken off. This is very helpful for me to understand how each part it put together. Its wireframe is made up of 19k triangular polygons. The highest density of these polygons is in the hands, shoulders, lower legs and head. These larger amounts of polygons typically indicate either higher detail or

Tidying polygons

Image
When it came to working on Arthur more, I first needed to smooth his pelvis however, when I first tried to do this, I felt like I did it very messily. In order to smooth his pelvis, I kept cutting the polygons to make more edges and vertices wherever I could in order to make it appear smoother. This made it look very untidy and I felt like it would cause problems when it comes to texturing his model.  Therefore I decided to completely redo his pelvis area to make it much cleaner but still keeping the smoothness.  In order to do so, I had to completely remove the messy polygons, cap the holes and re-add them through a lot of cutting and moving of vertices. It took a decent amount of time to fix this part of the model however I felt it was necessary to help me later on. I do also feel like it looks much better now when comparing it to what it was before.

Arthur's basic model

Image
  Now that Guinevere is complete, I started on the Arthur model. This has been a lot easier that the Guinevere one as it, as seen, has much more angular shapes. In my pervious post about the Arthur model, I had done most of the body - excluding the hand and head. These are now complete although they were the most time consuming parts out of all the entire body.  The hand was difficult as I wanted to keep the detail of the gauntlets that I designed him to have. I had to also make sure that it was thick enough to look realistic and also strong enough for when it comes to making him into a 3D print.  The head was certainly the hardest part as it was the most rounded part of him so far. I needed to make sure it was still realistic. One thing that I found after completing the head was that it looked too narrow when comparing it to the body. Therefore I increased its width to make his proportions match.  Now that Arthur's basic shape is complete. I will now go back over it to correct odd

Getting Guinevere ready for 3D printing

Image
  One part of my proposal is to print the characters as 3D models. In order to do this, I have to do is to make sure that each model was ready to print.  With Guinevere complete, her dress's skirt was extremely flimsy and would easily break when printed. This meant that I had to add supports to the skirt. Firstly, I thickened the skirt using shell. This was already a challenge as I had to seperate the skirt from the torso as when using shell, it would apply it to the torso as well.  In order to stop the whole model coming apart when being printed, I increased the length at the top of the skirt so it clipped into the torso so they were fully connected.  Along with this, I also had to alter a few of the vertices due to some looking out of place after shell was applied.  I wanted to add as much support as I could to the skirt so it wouldn't break. Therefore I also added rings around it to add that extra strength and to (in a way) replicate a hoop skirt that women used to have unde

Starting Arthur

Image
Now that I'm close to completing Guinevere, I have now started working on the Arthur model. So far I have done half of his body which I will add symmetry too once this half is complete.  The hardest part so far for this model was around the knee where he has 5 connections on each section. I had to do a lot of insets, extrudes and welding in order to make this work. Once I got the lower set done, I was able to do the higher set quickly. I've also had to keep resizing the lower arm as well to make it look more believable yet still muscular to make it look masculine.  I will now go onto completing the arm and head. After that I will be applying chamfer and adding additional edges to where I want him to be smoother like on the arms, neck and knee connections. I won't be applying Turbosmooth to the Arthur model as I want a lot of him to stay angular and more robotic.  I will also be adding any other necessary details to him to make him more interesting.